Angular 6 Tutorial - Learn Angular 6 in this Crash Course
Note: Angular 7 just released. Read or watch my
Angular 7 Tutorial here!
Angular 6 has been out for a few weeks, so it's time to rehash my popular fundamentals series on Angular! This little crash course / tutorial for you if you have never worked with Angular 2+ before.
The difference between Angular 2-6 isn't massive if we're talking about the core fundamentals, but AngularJS (1.0) certainly is!
In this tutorial, I'm going to teach you
by example, while discussing how things work and why they work.
Our app will fetch data from a mock API service and display it in a beautiful UI.
You're going to learn how to:
- Install Angular 6 with the Angular CLI
- Understand and Create Components
- Understand and Create Services
- Working with HTML & CSS in Angular 6
- Working with Angular 6 Routing
- Working with the Angular 6 HTTP Client
Let's get started!
How to Install Angular 6
The quickest and easiest way of starting an Angular 6 app is through the Angular CLI (Command Line Interface).
To install it, you're going to need either the yarn package manager or the node package manager. To check whether or not you have npm, in your console / command line, type:
> npm -v
If this goes unrecognized (and not a version number), you need to install
NodeJS. Once you install NodeJS, reload your console or command line and you will have access to NPM.
Now, we can use NPM to install the Angular CLI. The Angular CLI has an official
website located here.
To install it:
> npm install -g @angular/cli
If you run
ng -v after installing, it will provide you with the version number. Mine happens to be
6.0.7.
Once the CLI is installed, we can now use it to start a install a brand new Angular 6 project:
> ng new ng6-proj --style=scss --routing
- ng - This is how we call the Angular CLI.
- new - This is one of the many commands we can issue to the CLI.
- ng6-proj is simply the name that we're calling our project. The CLI will create a folder with this name, based on where you're running this command.
- Optional flags - Next are two optional flags that I decided to add. First, we're telling the CLI to generate a project that has Sass enabled (by default, CSS is used if this is not specified), and then --routing is added because we want a project that has different page URL's, and adding this flag will help create a routing file for us.
To check out all of the available commands and options, run
ng at the command line.
Once the CLI has generated the new project, you can hop into it:
> cd ng6-proj
If you use Visual Studio Code, you can type
code . to launch the code editor. Then, to serve the project to the browser, you run:
> ng serve -o
The -o flag tells the CLI to launch your browser with the project. Now, you're able to watch your Angular 6 project as you code and it will automatically live reload. Awesome!
Angular 6 Project Structure
This is a beginner's tutorial, so we're not going to do a deep dive into every file. All that's important for you to understand are the absolute basics.
When you view the folder and file structure of your Angular 6 app, it should look something similar to this:
> e2e
> node_modules
> src
  > app
    ...a bunch of files
...a bunch of files
You're going to spend most of your time working within the
/src/app folder. This is where components and services are stored (we'll get to those shortly).
In the
/src/ folder itself, you will see an
index.html (the apps entry point) and a
styles.css file, which is where any global CSS rulesets are placed.
The
/src/assets folder is where you place any assets such as graphics.
Not present right now is a
/dist/ folder, which is generated when you build the project, which we'll do later on.
The Angular 6 Module File
Before we tackle components, it's worth looking at the
/src/app/app.module.ts file. Oh, and by the way, what is that
.ts extension? It stands for TypeScript, and Angular 6 uses TypeScript. In short, TypeScript provides strong type checking on JavaScript.
The
app.module.ts file looks like this:
import { BrowserModule } from '@angular/platform-browser';
import { NgModule } from '@angular/core';

import { AppRoutingModule } from './app-routing.module';
import { AppComponent } from './app.component';

@NgModule({
  declarations: [
    AppComponent
  ],
  imports: [
    BrowserModule,
    AppRoutingModule
  ],
  providers: [],
  bootstrap: [AppComponent]
})
export class AppModule { }
Whenever you use the CLI to generate components and services, it will automatically update this file to import and add them to the
@NgModule decorator. Components are added to the
declarations array, and services are added as
providers. You will also find yourself adding various imports to the
imports array. For instance, when we want to add animations, we will add them here.
If you're a little confused at this point, don't worry. Just understand that this is an important file that you will need to visit routinely. The CLI will take care of things for the most part, especially when generating components, but when generating services and performing some other tasks, you will need to visit this file. You'll see as a proceed.
Angular 6 Components Tutorial
A component in Angular 6 provides you with the basic building blocks of your Angular app. When we used the Angular CLI to generate our project, it created a single component.
When you use the CLI to generate components, it creates 4 files:
> src
  > app
    app.component.html
    app.component.scss (or .css)
    app.component.spec.ts
    app.component.ts
- The HTML file is the HTML template associated with that component.
- The SCSS or CSS is the associated CSS rulesets for that component (whatever is defined in the HTML file)
- The .spec.ts file is for testing purposes.
- The .ts file is the actual component file, and it's where you will likely spend most of your time. It defines a number of things.
Open up the
app.component.ts file:
import { Component } from '@angular/core';

@Component({
  selector: 'app-root',
  templateUrl: './app.component.html',
  styleUrls: ['./app.component.scss']
})

export class AppComponent {
  title = 'app';
}
At the top, we have our imports. You will import other components here, along with service files. We'll do that a little later.
The
@Component decorator is an object with associated property / value pairs that defines important stuff associated with this component. For instance, you will see
selector: 'app-root' - This provides this component with a unique identifier that is used in other areas of the app. You can also see
templateUrl and
styleUrls, which tells Angular where this component's HTML and CSS files are located. There are other properties that can be added here, such as animations, but we'll get to that later.
Finally, we have the logic section of the component file. This is where properties (we see that
title was defined by the CLI), dependency injection and methods are defined.
Now that you understand the very basics of a component, let's create a few of our own!
In the console, run:
> ng generate component sidebar
CREATE src/app/sidebar/sidebar.component.html (26 bytes)
CREATE src/app/sidebar/sidebar.component.spec.ts (635 bytes)
CREATE src/app/sidebar/sidebar.component.ts (274 bytes)
CREATE src/app/sidebar/sidebar.component.scss (0 bytes)
UPDATE src/app/app.module.ts (479 bytes)
Here, we've told the CLI to
generate a
component with the name of
sidebar. It outputs the 4 files it created, along with the app module file it updated!
Let's generate a few more components. Run the following commands to generate 3 more components:
> ng g c posts
> ng g c users
> ng g c details
Now, you should have a total of 5 components, 4 of which we just created ourselves. Shortly, you'll see how all of these start to work with each other and in relation to the app.
Angular 6 Templating
Let's say for instance that we want our particular app to have a sidebar with some icons. This sidebar will always be present in the app. The
sidebar component is something we already generated with the CLI.
Open the
src/app/app.component.html file. You will see all of the boilerplate HTML the CLI generated, and consequently, what you see in the browser for the time being. Remove all of that and paste this (or better yet, type it!):
<div id="container">
  <app-sidebar></app-sidebar>

  <div id="content">
    <router-outlet></router-outlet>
  </div>
</div>
We've wrapped everything in a
container id. Then, you will notice a custom HTML element called
app-sidebar. What's that?
Well, when the CLI generated the
sidebar component, it made the component's
selector value
app-sidebar. Don't believe me? Check out
/src/app/sidebar/sidebar.component.ts -- It's right there in the component decorator! That's how you embed a component inside of another component. Now, anything defined in that component's HTML, will be displayed where
<app-sidebar></app-sidebar> is defined.
Another very important element is the
router-outlet. This was added by the CLI when we added the
--routing flag (it also generated a routing file in
/src/app.
This element defines where any components defined by their routes will be displayed.
Let's head over to the
/src/app/sidebar/sidebar.component.html file to define the sidebar templating:
<nav>
  <ul>
    <li>
      <a routerLink="">
        <i class="material-icons">supervised_user_circle</i>
      </a>
    </li>
    <li>
        <a routerLink="posts">
          <i class="material-icons">message</i>
        </a>
      </li>
  </ul>
</nav>
You will notice
routerLink= here. Instead of
href, we use
routerLink to direct the user to different routes. Right now, this will not work though, we'll get to that during the routing section.
We're also going to use
Material Icons, so we need to import that first.
Save this file and open up
/src/index.html and add the following 2 lines between the
<head> tags:
<link href="https://fonts.googleapis.com/icon?family=Material+Icons"
      rel="stylesheet">

<link href="https://fonts.googleapis.com/css?family=Montserrat:300,700" rel="stylesheet">
We're importing material icons first, and then a Google web font called Montserrat.
Angular 6 CSS
Let's add some CSS rulesets to make our app look better. First, open up
/src/styles.css. Any CSS/Sass defined here will apply to the HTML templating of all components, while component-specific CSS files only apply to that component's HTML template.
Add the following rulesets:
body {
margin: 0;
background: #F2F2F2;
font-family: 'Montserrat', sans-serif;
height: 100vh;
}
#container {
display: grid;
grid-template-columns: 70px auto;
height: 100%;
#content {
padding: 30px 50px;
ul {
list-style-type: none;
margin:0;padding:0;
li {
background: #fff;
border-radius: 8px;
padding: 20px;
margin-bottom: 8px;
a {
font-size: 1.5em;
text-decoration: none;
font-weight: bold;
color:#00A8FF;
}
ul {
margin-top: 20px;
li {
padding:0;
a {
font-size: 1em;
font-weight: 300;
}
}
}
}
}
}
}
This is a little lengthy because I don't want to keep revisiting this file. The rulesets here are applying to some elements that we haven't yet defined. Nothing too exciting is happening here though, just some standard Sass/CSS.
Next, open up the sidebar CSS file
/src/app/sidebar/sidebar.component.scss:
nav {
    background: #2D2E2E;
    height: 100%;

    ul {
        list-style-type: none;
        padding: 0;
        margin: 0;

        li {

            a {
                color: #fff;
                padding: 20px;
                display: block;
            }

            .activated {
                background-color: #00a8ff;
            }
        }
    }

}
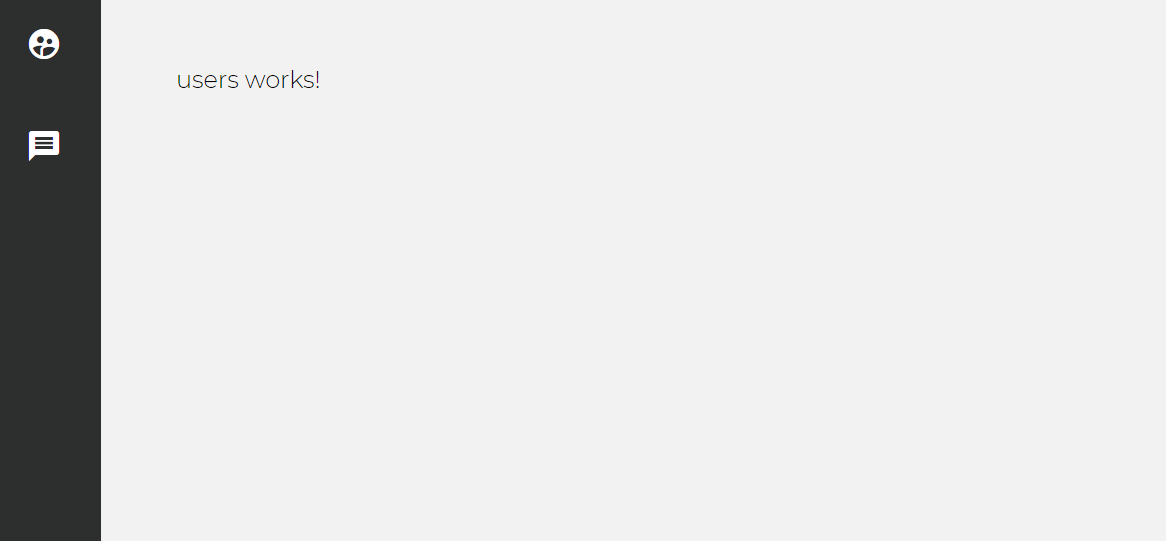
Great. View your browser and the result should look like this:
Angular 6 Routing Tutorial
Now, let's make our 2 icons work when they're clicked. In order to do that, we need to visit the
/src/app/app-routing.module.ts file.
This is what it looks like:
import { NgModule } from '@angular/core';
import { Routes, RouterModule } from '@angular/router';

const routes: Routes = [];

@NgModule({
  imports: [RouterModule.forRoot(routes)],
  exports: [RouterModule]
})
export class AppRoutingModule { }
We need to import our components at the top, and add them to the
Routes array shown on line 4 above.
To do that, add the following:
import { NgModule } from '@angular/core';
import { Routes, RouterModule } from '@angular/router';
import { UsersComponent } from './users/users.component';
import { DetailsComponent } from './details/details.component';
import { PostsComponent } from './posts/posts.component';

const routes: Routes = [
  {
    path: '',
    component: UsersComponent
  },
  {
    path: 'details/:id',
    component: DetailsComponent
  },
  {
    path: 'posts',
    component: PostsComponent
  },
];
We've imported our 3 components, and then defined three objects in the
Routes array.
The first object specifies that the
UsersComponent will be the default component that loads on the root path. We leave the path value empty forthis.
The next route is for a user details section. We've specified a wildcard named
id. We'll use this to fetch that value from the router in order to retrieve the correct user details.
Then another route for a component and path called posts.
Save this file, and the browser should now show:
Awesome!
Angular 6 Services
For our users component, we want to fetch a list of users from a public API. To do that, we're going to use the Angular CLI to generate a service for us.
An Angular 6 service is useful placing code that's reusable throughout your app's different components.
In the console, type:
> ng generate service data
Open up the new service file:
/src/app/data.service.ts:
import { Injectable } from '@angular/core';

@Injectable({
  providedIn: 'root'
})
export class DataService {

  constructor() { }
}
It looks similar to a regular component, right? You define your imports at the top, and your methods and properties in the class that's exported.
The purpose of our service file will be to communicate with an API via the Angular 6 HTTP Client.
Angular 6 HTTP Client
Angular comes with a built in HTTPClient. Let's import that at the top of our
data.service.ts file:
import { Injectable } from '@angular/core';
import { HttpClient } from '@angular/common/http';
Next, in order to use the HttpClient, we need to create an instance of it through dependency injection within the constructor:
  constructor(private http: HttpClient) { }

  getUsers() {
    return this.http.get('https://jsonplaceholder.typicode.com/users')
  }
We also defined a method called
getUsers() which we'll call in our component shortly. It returns a list of users from a public testing API.
Before we can use the HTTPClient, we need to add as an import in our app's
/src/app/app.module.ts file:
import { HttpClientModule } from '@angular/common/http';
@NgModule({
declarations: [
],
imports: [
BrowserModule,
AppRoutingModule,
HttpClientModule,
],
providers: [],
bootstrap: [AppComponent]
})
Great!
Next, let's open up the
/src/app/users/users.component.ts file and import our service:
import { Component, OnInit } from '@angular/core';
import { DataService } from '../data.service';
import { Observable } from 'rxjs';
To display the results, we're going to use an Observable, so we're importing it here, too.
In the class, add:
export class UsersComponent implements OnInit {

  users$: Object;

  constructor(private data: DataService) { }

  ngOnInit() {
    this.data.getUsers().subscribe(
      data => this.users$ = data
    );
  }

}
In the constructor, we're creating an instance of our service. Then, within the lifecycle hook
ngOnInit() (this runs when the component loads), we're calling our
getUsers() method and subscribing to it. Inside, we're binding our
users$ object to the result returned by the API.
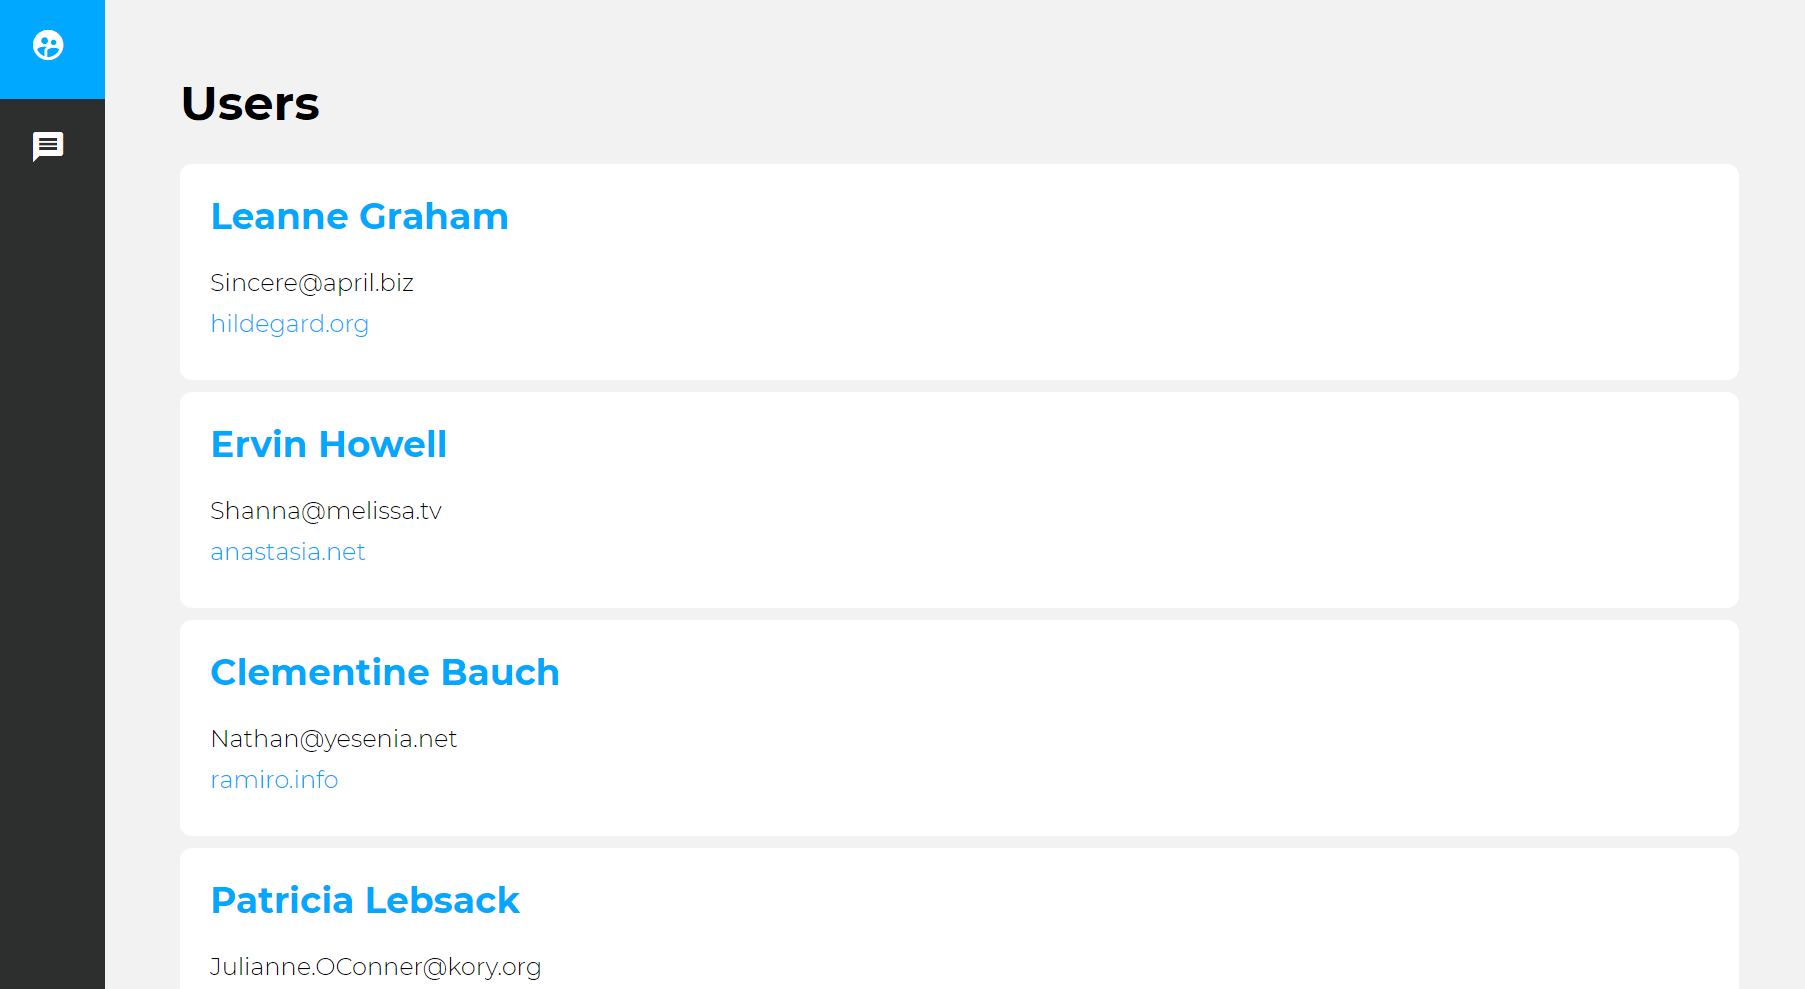
Next, open up
/src/app/users/users.component.html:
<h1>Users</h1>

<ul>
  <li *ngFor="let user of users$">
    <a routerLink="/details/{{user.id}}">{{ user.name }}</a>

    <ul>
      <li>{{ user.email }}</li>
      <li><a href="http://{{ user.website }}">{{ user.website }}</a></li>
    </ul>
  </li>
</ul>
Whenever you wish to iterate over an array or array of objects, you use the Angular directive *
ngFor. We then use interpolation brackets to call upon the properties of the returned object to display them in the browser!
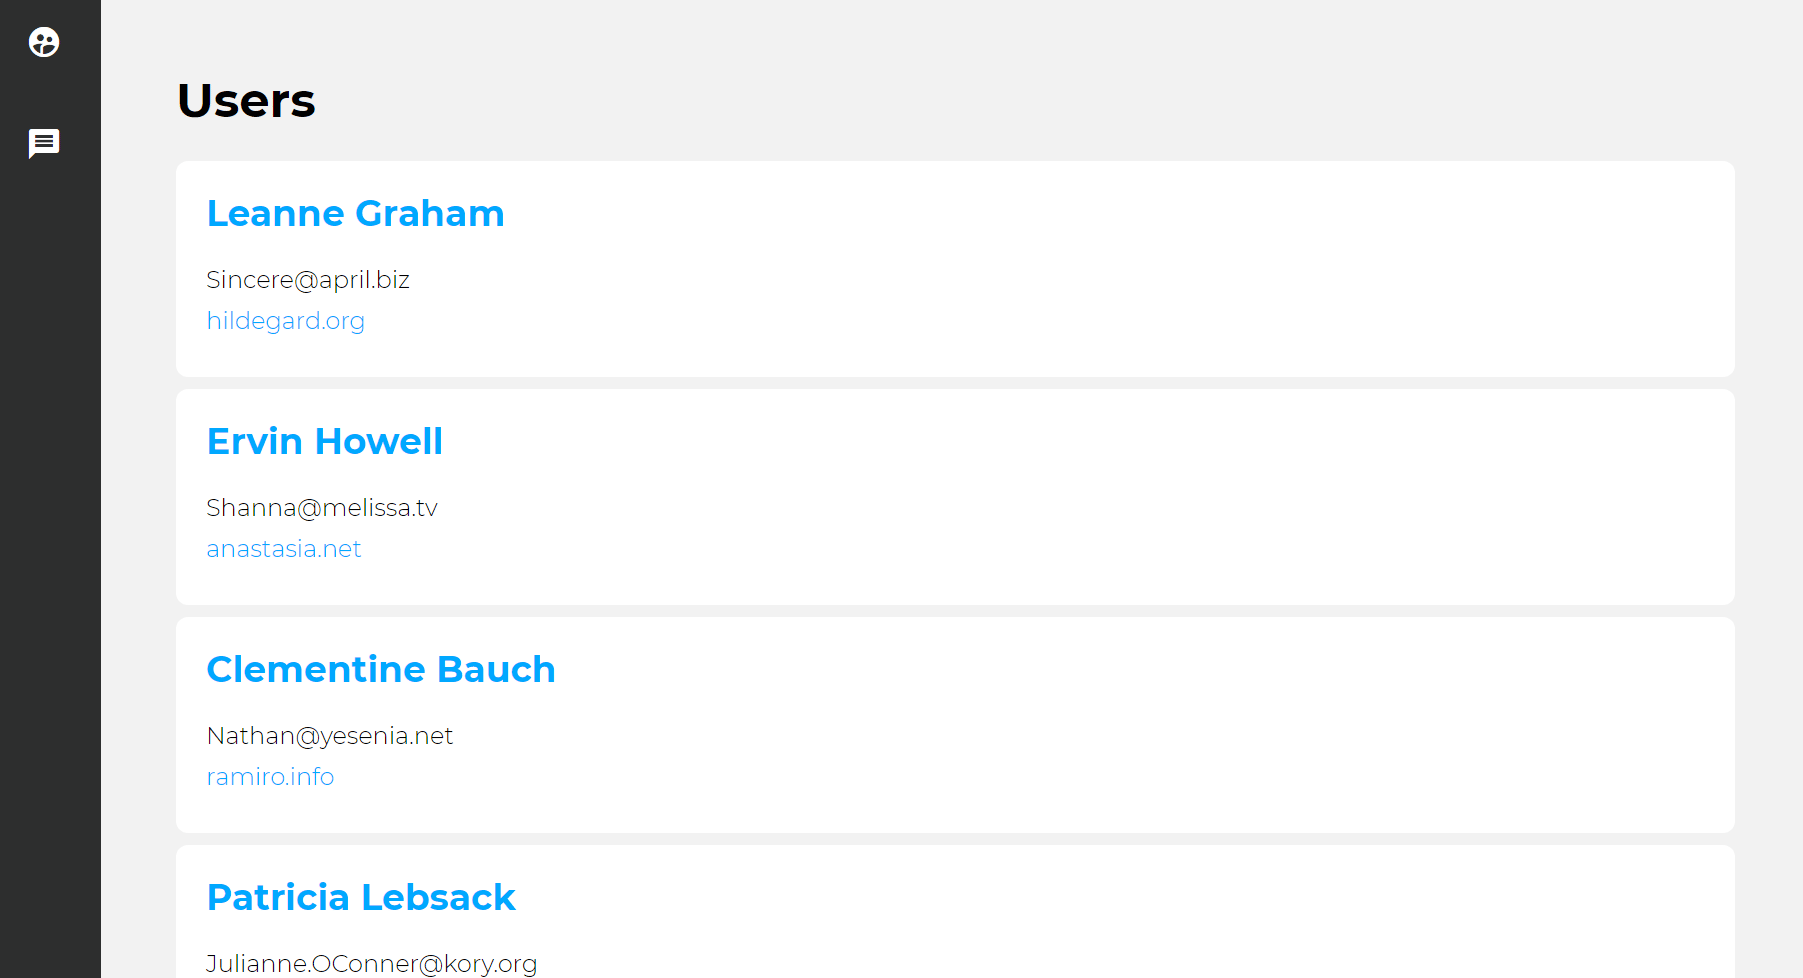
If you save this and refresh, you should now see a list of users and their information:
Fetching More Data from the API
Let's revisit the service file
/src/app/data.service.ts and add the following methods:
  getUser(userId) {
    return this.http.get('https://jsonplaceholder.typicode.com/users/'+userId)
  }

  getPosts() {
    return this.http.get('https://jsonplaceholder.typicode.com/posts')
  }
The
getUser() method will provide us with a single user's information, which will accept a
userId as a parameter.
getPosts() will fetch some fictional posts for us to get more muscle memory with this process of communicating with services.
Visit
/src/app/details/details.component.ts:
import { Component, OnInit } from '@angular/core';
import { DataService } from '../data.service';
import { Observable } from 'rxjs';
import { ActivatedRoute } from "@angular/router";

@Component({
  selector: 'app-details',
  templateUrl: './details.component.html',
  styleUrls: ['./details.component.scss']
})
export class DetailsComponent implements OnInit {

  user$: Object;

  constructor(private route: ActivatedRoute, private data: DataService) {
     this.route.params.subscribe( params => this.user$ = params.id );
  }

  ngOnInit() {
    this.data.getUser(this.user$).subscribe(
      data => this.user$ = data
    );
  }

}
This, as you see, is very similar to our
users component. The only difference comes when we import
ActivatedRoute and call it within the constructor.
The purpose of this code allows us to grab the
id router parameter that we defined in the app's routing file earlier. This will give us access to the user ID and then pass it to the
getUser() method that we defined.
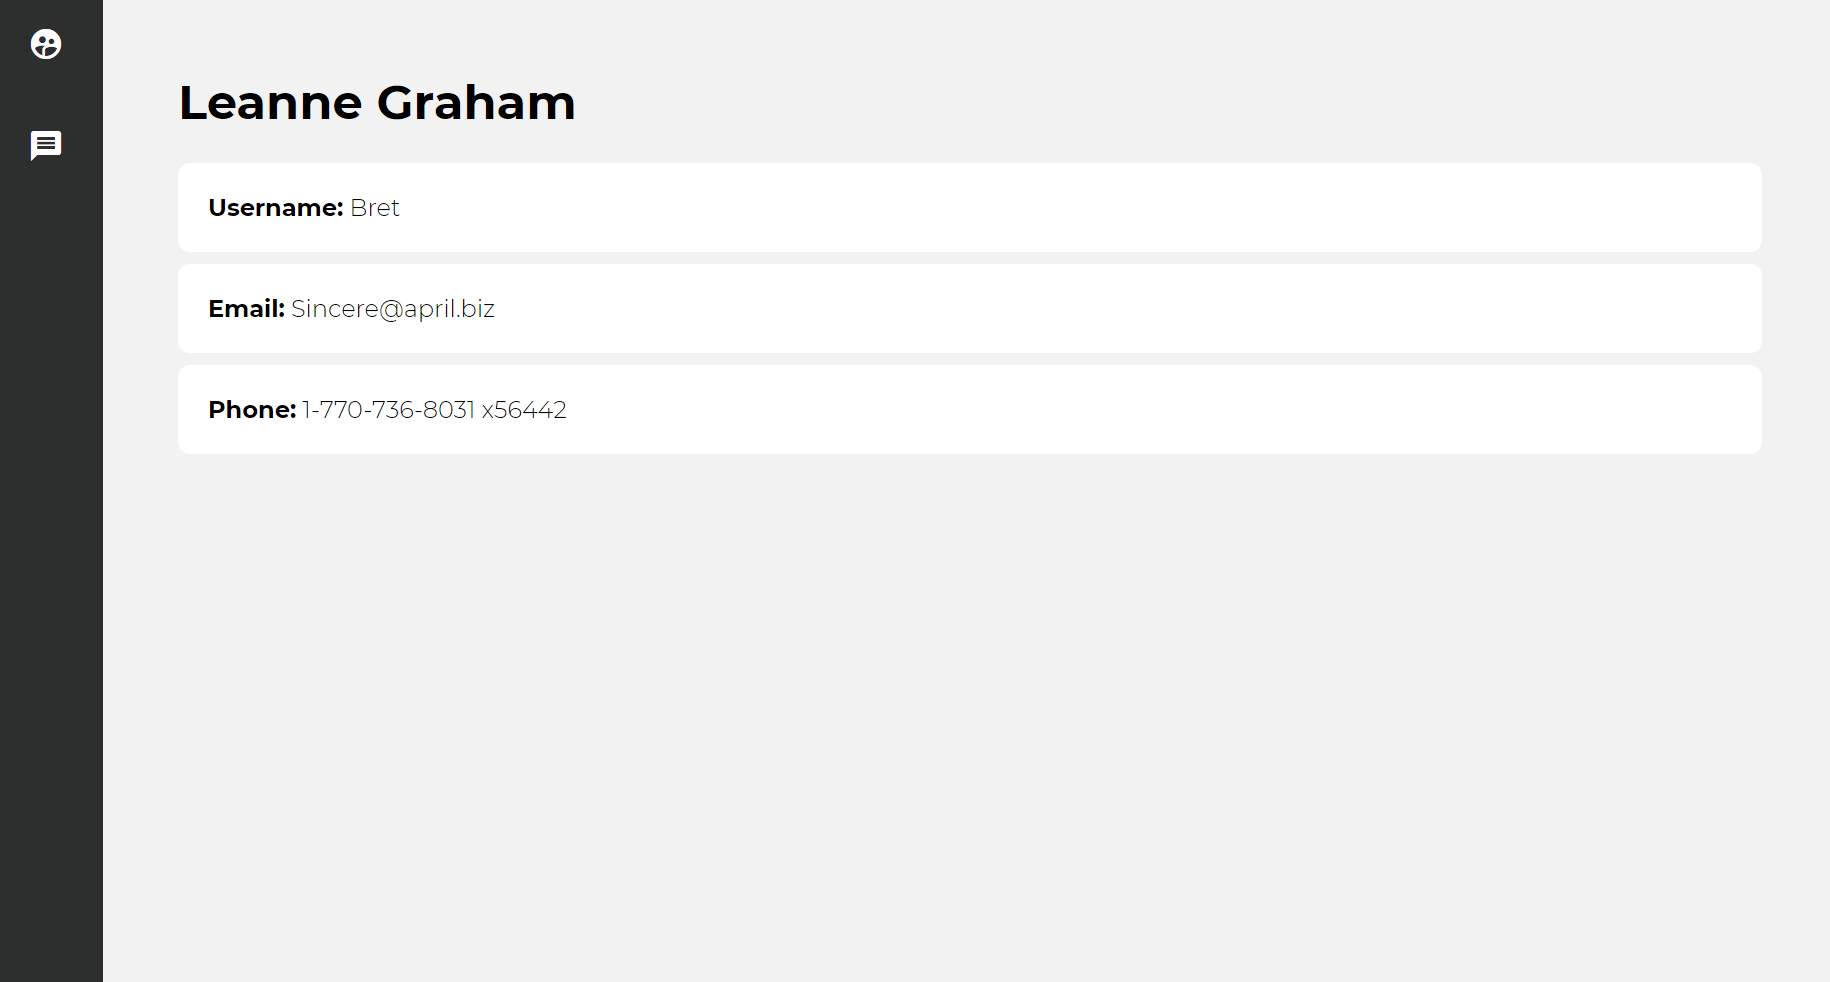
Open up the
details.component.html and specify:
<h1>{{ user$.name }}</h1>

<ul>
  <li><strong>Username:</strong> {{ user$.username }}</li>
  <li><strong>Email:</strong> {{ user$.email }}</li>
  <li><strong>Phone:</strong> {{ user$.phone }}</li>
</ul>
Save it, and click on one of the user's names:
Awesome!
For more muscle memory, let's repeat this process for the
/src/app/posts/posts.component.ts file:
import { Component, OnInit } from '@angular/core';
import { DataService } from '../data.service';
import { Observable } from 'rxjs';

@Component({
  selector: 'app-posts',
  templateUrl: './posts.component.html',
  styleUrls: ['./posts.component.scss']
})
export class PostsComponent implements OnInit {
  posts$: Object;

  constructor(private data: DataService) { }

  ngOnInit() {
    this.data.getPosts().subscribe(
      data => this.posts$ = data
    );
  }

}
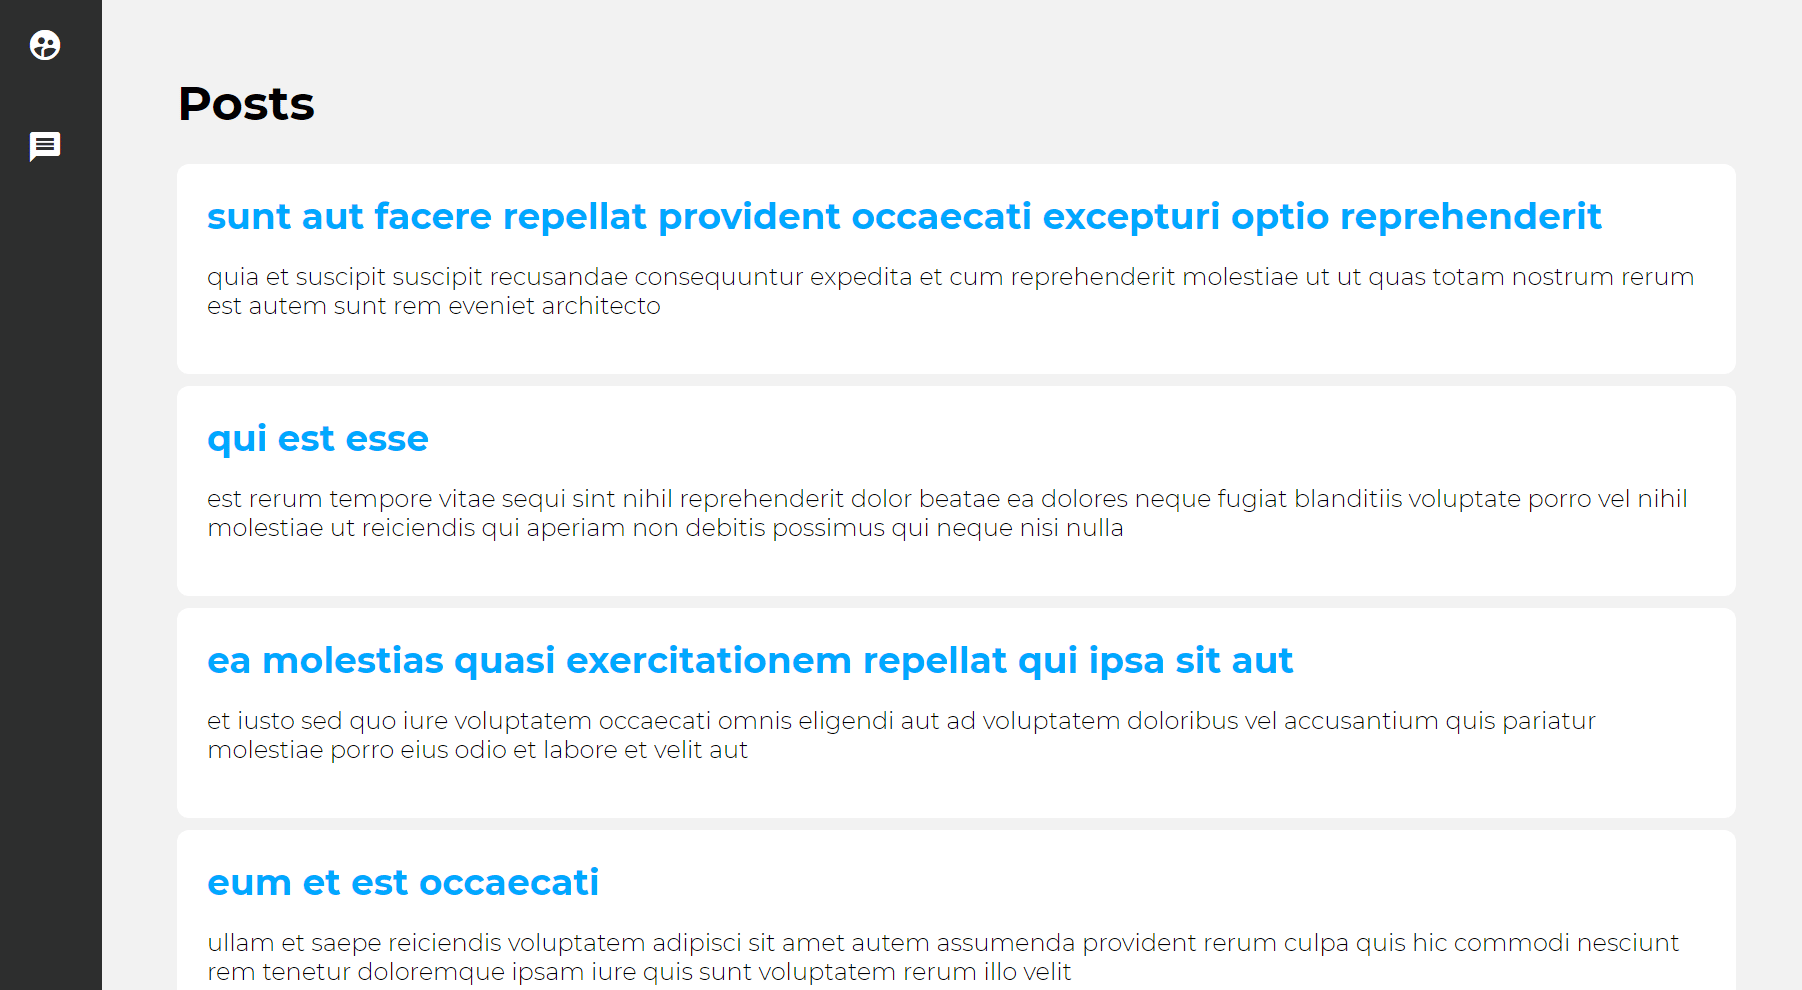
And the
posts.component.html file:
<h1>Posts</h1>

<ul>
  <li *ngFor="let post of posts$">
    <a routerLink="">{{ post.title }}</a>

    <p>{{ post.body }}</p>
  </li>
</ul>
Save it, and click on the posts icon in the sidebar:
Great!
Angular 6 Class Binding
It would be nice to indicate which page a user is currently on in the left sidebar, perhaps by adding a class to the icon that will make its' background blue? Sure!
Visit the
/src/app/sidebar/sidebar.component.ts file and add the following:
import { Component, OnInit } from '@angular/core';
import { Router, NavigationEnd } from '@angular/router';

export class SidebarComponent implements OnInit {

  currentUrl: string;

  constructor(private router: Router) {
    router.events.subscribe((_: NavigationEnd) => this.currentUrl = _.url);
  }

  ngOnInit() {}

}
We're importing the Router and NavigationEnd, then defining a string property
currentUrl. Then, we create an instance of the Router in order to subscribe to
router.events. It will provide us with a string, which is the current router path.
Open the
sidebar.component.html file and update it to match:
<nav>
  <ul>
    <li>
      <a routerLink="" [class.activated]="currentUrl == '/'">
        <i class="material-icons">supervised_user_circle</i>
      </a>
    </li>
    <li>
      <a routerLink="posts" [class.activated]="currentUrl == '/posts'">
        <i class="material-icons">message</i>
      </a>
    </li>
  </ul>
</nav>
Class binding works by binding
[class.csspropertyname] to a template expression. It will only add the
.activated CSS ruleset (defined in
styles.scss) if our
currentUrl is equal to either
/ or
/posts.
Save it. The result should now look like this:
Try clicking on the other icon!
Angular 6 Animation Tutorial
Let's say for instance that we want our list of user's on the user's page to fade in when the component loads. We can use Angular's powerful animation library to help us achieve this.
In order to gain access to the animation library, we have to first install it from the console:
> npm install @angular/animations@latest --save
Then, we add it to the imports of
/src/app/app.module.ts:
import { BrowserAnimationsModule } from '@angular/platform-browser/animations';
@NgModule({
...
imports: [
BrowserAnimationsModule
],
})
Next, open up
/src/app/users/users.component.ts and add the following to the top imports:
import { trigger,style,transition,animate,keyframes,query,stagger } from '@angular/animations';
Then, in the component decorator, add the following animations property with the associated code:
@Component({
selector: 'app-users',
templateUrl: './users.component.html',
styleUrls: ['./users.component.scss'],
animations: [
trigger('listStagger', [
transition('* <=> *', [
query(
':enter',
[
style({ opacity: 0, transform: 'translateY(-15px)' }),
stagger(
'50ms',
animate(
'550ms ease-out',
style({ opacity: 1, transform: 'translateY(0px)' })
)
)
],
{ optional: true }
),
query(':leave', animate('50ms', style({ opacity: 0 })), {
optional: true
})
])
])
]
})
Whew, a lot happening here!
- We start off by defining an animation by giving it a trigger with a name listStagger.
- Next, we use transition to define when the animations will take place, from one animation state to the other. A wildcard is used to say from any state to any state, in this case.
- Then, we use query to say that on :enter, we apply an initial style that's hidden and moved on the Y axis by -15px, and make a stagger animation for each sequential element.
- At the end, we define an optional :leave animation.
To make this work, visit the
/src/app/users/users.component.html file and reference the animation trigger:
<ul [@listStagger]="users$">
Save it, and click on the users icon. You will notice that the list animates in!
There's a lot more to Angular animation, so this is just one potential use case.